Monday, November 21, 2011

November's Pizza del Mese: Winter Squash, Onion, and Pine Nut Pizza

Ironically, shortly after I made this pizza, Serious Eats posed this question:
Squash on Pizza, Way or No Way? After tasting this pizza, I am a firmly in the "Squash on Pizza, Way" camp.

The original recipe suggested Semolina Pizza Dough (see recipe in September's Pizza del Mese: White Clam Pizza). I used the Classic Pizza Dough because when I made October's Pizza del Mese, I just tripled the dough recipe, then divided into thirds, let them rise, and put two of the thirds in ziploc bags in the freezer.

Winter Squash, Onion, and Pine Nut Pizza adapted from Pizza: Grill It, Bake It, Love It! by Bruce Weinstein and Mark Scarbrough
Ingredients
  • Vegetable oil to apply to the cooking surface of Lodge Pro Logic Cast-Iron 14-Inch Pizza Pan
  • One recipe Classic Pizza Dough (see recipe in January's Pizza del Mese: Pizza Margherita)
  • 2 T olive oil
  • 2 med. yellow onions, halved through the stem, then thinly sliced (you can tell I used rings instead of cutting my onions this way . . . I also grilled them instead of pan frying them).
  • 3/4 C winter squash puree (to make up for my onion transgression I made my winter squash puree from an actual winter squash)
  • 1 t rubbed sage
  • 1/4 t ground nutmeg
  • 1/4 t salt
  • 1/4 t freshly ground black pepper
  • l 1/2 oz. Parmigiano-Reggiano, or Grana Padano, or Pecorino, finely grated
  • 1 T pine nuts
Procedure
  • Position the rack in the center of the oven. Preheat the oven to 450.
  • Apply a thin coating of vegetable oil to the surface of the cast iron pizza pan. Lay the dough at its center and dimple the dough with your fingertips. Then pull and press the dough until it forms a 14-inch circle on the pizza pan.
  • Heat a large skillet over medium heat, then swirl in the olive oil. Add the
    onion slices, reduce the heat to very low, and cook, stirring often, until soft,
    golden, and very sweet, 20 to 25 minutes.
  • Meanwhile, stir the squash puree, sage, nutmeg, salt, and pepper in a me­dium bowl until uniform. Spread this mixture evenly over the prepared crust, leaving a 1/2-inch border at its edge.
  • Top with the caramelized onions, then sprinkle the grated Parmigiano-Reggiano
    and pine nuts over the pie.
  • Place the pie on its pizza pan in the oven on the middle rack. Check it about every three minutes for the first nine minutes to pop any air bubbles that may blow up at its edge or across its surface. Bake until until the crust is somewhat firm and lightly browned, 14 to 16 minutes.
  • Transfer the pizza pan to a wire rack to cool for 3 minutes. Remove the pie from the pan, transferring it directly to the wire rack to cool for about 5 minutes.
Previous Pizza del Mese:

Click here to see the rest of this post...

Friday, November 11, 2011

October's Pizza del Mese: Broccoli Cheese Deep Dish Pizza

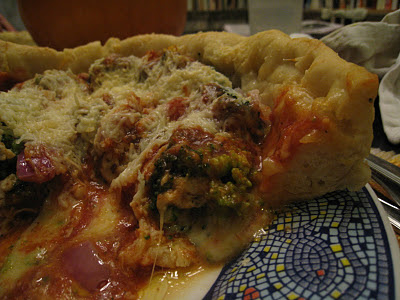
October's Pizza del Mese, which was, I swear, actually made in October, was a super easy, yummy, relatively nutritious weekend dinner.

Broccoli Cheese Deep Dish Pizza adapted from Pizza: Grill It, Bake It, Love It! by Bruce Weinstein and Mark Scarbrough
Ingredients
Procedure
  • Position the rack in the center of the oven. Preheat the oven to 450.
  • Apply a thin coating of vegetable oil to the 10-inch springform pan. Press the dough into the pan, stretching the dough across the pan's bottom and then pulling the dough a bit up the sides, about 1 inch. Cover with a clean kitchen towel.
  • Sprinkle the shredded Monterey Jack and mozzarella evenly over the bottom
    of the pie. Top with the broccoli and onion, making sure both are evenly distributed across the surface.
  • Dot the pie with the pizza sauce, then top with the grated Pecorino.
  • Place the pie in the oven on the middle rack. Check it about every three minutes for the first nine minutes to pop any air bubbles that may blow up at its edge. Bake until the cheese has melted and the sauce is bubbling and a little thick, about 30 minutes.
  • Transfer the pizza pan to a wire rack to cool for 5 minutes. Open the springform and remove the pie from the pan, transferring it directly to the wire rack to cool for another 5 minutes, then cut into wedges to serve.
Previous Pizza del Mese: September's Pizza del Mese: White Clam Pizza

Click here to see the rest of this post...

Monday, October 31, 2011

October's Au Lait du Mois: Cream Cheese

I have learned that there are a whole bunch of ways to make cream cheese: the uncooked-curd method, the cooked-curd method, Swiss-style, Creole, French-style, and probably a few more I'm missing. I opted for the easiest way: the uncooked-curd method. The results were absolutely amazing. Of all the Au Lait du Mois I've done so far, this is the one that I'm definitely doing again, and probably soon.

I only let it drain for something like six hours and I didn't chill it at all. Before chilling, it was very light and spreadable, but still rich and creamy. We brought it along with some organic whole wheat artisanal bread to a dinner party. It was a huge success.
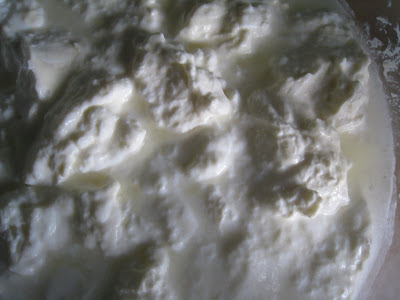
This is the bowl after two days in the refrigerator. You can notice two things. First, it's almost empty because it's so awesome. Second, it's very thick and almost crumbly without any whey draining out of it. I don't think you need to let it drain for the whole 12 hours recommended in the recipe. If it's not as thick as you'd like it, just pop it in the fridge. It will harden up to the consistency of a cold brick of Philadelphia cream cheese. But this tastes so much better.

The original recipe called for 2 quarts pasteurized light cream or pasteurized half-and half. Being a glutton, I opted for 2 quarts raw heavy cream from Mother's Market that recently opened in Brea. Yup, you can buy raw milk in grocery stores here. Unfortunately, there are still 11 states where raw milk is illegal and Maryland is one of them. Check out this post from New England Cheesemaking about the Maryland Raw Milk Freedom Riders event.

Cream Cheese: Uncooked-Curd Method adapted from Ricki Carroll's Gourmet Home Dairy Kit
Ingredients:
  • 2 quarts heavy cream
  • 1 packet direct-set mesophilic starter or 4 ounces prepared mesophilic starter (I used the buttermilk starter that came with the Gourmet Home Dairy kit)
  • Cheese salt (optional)
Implements:
  • 2 qt. jar
  • Sieve
  • Bowl
  • Butter Muslin
Procedure:
  • Pour the cream into the jar and bring it to room temperature (72°F). Add the starter and mix thoroughly.
  • Put the cap on the jar and let set at 72°F for 12 hours. A solid curd will form.
  • When 12 hour is just about up, set a sieve over a bowl and line the sieve with butter muslin.
  • Pour the curd into the muslin-lined sieve. Tie the corners of the muslin into a knot and hang the bag to drain for up to 12 hours, or until the bag stops dripping and the cheese has reached the desired consistency. Changing the bag once or twice will speed the draining process.
  • Place the cheese in a bowl. Add the salt to taste if desired.
  • Place the cheese into small molds and cool in the refrigerator. Once the cheeses are firm, take them out of the molds and wrap individually in cheese wrap.
  • Store in the refrigerator for up to 2 weeks.
Previous Au Lait du Mois:

Click here to see the rest of this post...

Sunday, October 30, 2011

Soda is Evil: And Makes You Evil, Too

Previously, I'd raised the specter of the health effects of soda. Now, I humbly share the results of a study about to be published in Injury Prevention:

Adolescents who drank more than five cans of soft drinks per week (nearly 30% of the sample) were significantly more likely to have carried a weapon and to have been violent with peers, family members and dates.
FYI, I found this via Prof. Berman's Sentencing Law and Policy blog.

Sunday, October 16, 2011

Cool produce

I meant to post this ages ago and then forgot.

We tried some new to us produce this summer:
dried fava beans, purslane, burgundy okra, slip skin melon.


I soaked the fava beans and then I was able to easily remove the outer layer to reveal the edible bean inside. When they cooked, they basically disolved into a mush that, when seasoned and mixed with olive oil, made a delicious sauce for pasta.


The purslane is somewhat lemoney and was great in a salad with feta and tomatoes. Purslane is the land plant with the most omega-3.


I miss these tomatoes already.


The okra tasted like regular okra, but was pretty. We mostly eat it raw.


The melon was good. Not quite as good as really good honeydew, but we certainly had no problems finishing it.

Posted by Picasa


Click here to see the rest of this post...

September's Pizza del Mese: White Clam Pizza

September's Pizza del Mese would be a great follow up to an overly generous summer clam bake. Chop up some of those leftover bivalves and make this delectable pizza. For those of us not so lucky, frozen chopped clams or even, gasp, canned clams will suffice. The fantastic garlic white wine sauce and the Pecorino cheese will more than make up for any shellfish shortcomings.

The recipe calls for fresh, not dried, parsley. I substituted cilantro as I have so much it's staging an Occupy Sarah's Refrigerator demonstration. It is, in fact, 99% of the produce in my house. I can see how fresh parsley would be good, but the cilantro worked well.
White Clam Pizza adapted from Pizza: Grill It, Bake It, Love It! by Bruce Weinstein and Mark Scarbrough
Ingredients
  • Vegetable oil to apply to the cooking surface of Lodge Pro Logic Cast-Iron 14-Inch Pizza Pan
  • One recipe Semolina Pizza Dough (see recipe below)
  • 2 T olive oil
  • 6 garlic cloves, minced
  • 1/2 t red pepper flakes
  • 12 oz. frozen chopped clams, thawed; or two 6- or 7-oz. cans clams, drained
  • 2 T dry white wine
  • 2 T chopped parsley leaves (or cilantro, in my case)
  • l 1/2 oz. Pecorino, finely grated
Procedure
  • Position the rack in the center of the oven. Preheat the oven to 450.
  • Apply a thin coating of vegetable oil to the surface of the cast iron pizza pan. Lay the dough at its center and dimple the dough with your fingertips. Then pull and press the dough until it forms a 14-inch circle on the pizza pan.
  • Heat a large skillet over medium heat. Swirl in the olive oil, then add the garlic and red pepper flakes. Cook, stirring constantly, for 30 seconds.
  • Stir in the clams, wine, and the parsley; bring to a simmer and cook, stirring often, until the liquid has reduced to a glaze, about 2 minutes. Don't let this go too long or there won't be enough liquid to counter the dryness of the Pecorino.
  • Spread the clam mixture evenly over the prepared crust, leaving a 1/2-inch border. Top with the grated Pecorino.
  • Place the pie on its pizza pan in the oven on the middle rack. Check it about every three minutes for the first nine minutes to pop any air bubbles that may blow up at its edge or across its surface. Bake until until the crust is somewhat firm and lightly browned, 14 to 16 minutes.
  • Transfer the pizza pan to a wire rack to cool for 3 minutes. Remove the pie from the pan, transferring it directly to the wire rack to cool for about 5 minutes.
This Semolina Pizza Dough turned out really well. I substituted bread flour for the all-purpose flour due to my irrational fear of low gluten content. The crust really puffed up around the perimeter and the texture was relatively light and airy. I'm definitely going to use this one again. Semolina Pizza Dough adapted from Pizza: Grill It, Bake It, Love It! by Bruce Weinstein and Mark Scarbrough Ingredients
  • 3/4 C lukewarm water (between 105 F and 115 F)
  • 1 1/2 t active dry yeast
  • 1/2 t sugar
  • 1/2 t salt
  • 1 1/2 C bread flour
  • 1/2 C semolina flour
  • 2 T olive oil
Procedure
  • Fill the bowl of a stand mixer with warm tap water, drain it, and dry it thoroughly. Stir the water, yeast, sugar, and salt together in the bowl just until everything is dissolved. Set aside so the yeast can begin to bubble and foam, about 5 minutes. If it doesn't, throw the mixture out and start again. The water may not have been the right temperature or the yeast expired.
  • Add the flours and olive oil, attach the dough hook, and beat at medium speed until combined. Continue kneading at medium speed, adding more bread flour in 1 T increments if the dough gets sticky, until the mixture is soft and elastic, about 7 minutes.
  • Wipe a clean, large bowl with a bit of olive oil on a paper towel. Place the dough in the prepared bowl, turning the dough so all sides are coated with oil, and cover the bowl with plastic wrap. Set aside in a warm, draft-free place until doubled in bulk, about 2 hours.
Previous Pizza del Mese:

Click here to see the rest of this post...

Saturday, October 15, 2011

Take It Outside

October 16th through 22nd is Take It Outside Week according to Head Start Body Start National Center for Physical Development and Outdoor Play (HSBS). Much in the same spirit as the Children & Nature Network's Let's G.O. (Get Outside)! month, which we participated in back in April, the goal of Take It Outside Week is "to encourage educators, families and caregivers to make time outdoors an important part of young children's daily lives."

We haven't found any formal activities in our area yet, but we're definitely contemplating an October Bonus Biome Tour on Friday. What are you going to do to get outside this week?

Wednesday, September 28, 2011

September's Au Lait du Mois: Buttermilk Cheese

So you've used 2 cups of your quart of buttermilk to make The Grit's 45 rpm Pancakes. What do you do with the other 2 cups? Make buttermilk cheese!

I made my buttermilk cheese into a veggie dip by adding a Penzeys Spices mix like Penzeys Spices Chip and Dip Seasoning like Rebecca added to the sour cream to make a dip back in June. The buttermilk cheese dip was much thicker.

Buttermilk Cheese adapted from Ricki Carroll's Gourmet Home Dairy Kit
Ingredients:
Implements:
  • 2 qt. pot
  • Dairy Thermometer
  • Sieve
  • Bowl
  • Butter Muslin
Procedure:
  • Allow the buttermilk to set at 72°F for 24 hours. This will slightly sour it. (If you prefer a less sour cheese, omit this step.)
  • Pour the buttermilk into a 2 qt. pot and affix the thermometer in a readable position.
  • Heat the buttermilk to 160°F. At that temperature, the buttermilk should separate into curds and whey. (If not, increase the temperature to 180°F.)
  • Meanwhile, set a sieve over a bowl and line the sieve with butter muslin.
  • Once the buttermilk separates into curds and whey, pour the coagulated buttermilk into the muslin-lined sieve. Tie the corners of the muslin into a knot and hang the bag to drain for 3-4 hours, or until the cheese has reached the desired consistency.
  • Place the cheese in a bowl. Add the salt to taste if desired.
  • Store in a covered bowl in the refrigerator for up to 2 weeks.
Previous Au Lait du Mois:

Click here to see the rest of this post...

Tuesday, September 27, 2011

August's Au Lait du Mois: Buttermilk

In an effort to catch up on my Au Lait du Mois posts, I made buttermilk for August and buttermilk cheese for September. Stay tuned for the buttermilk cheese post coming tomorrow.

Other than making buttermilk cheese, what does one do with buttermilk? I make pancakes. Specifically, I make 45 rpm Pancakes from The Grit Cookbook: World-Wise, Down-Home Recipes. The recipe follows the buttermilk recipe.

Buttermilk adapted from Ricki Carroll's Gourmet Home Dairy Kit
Ingredients:
  • 1 qt whole milk (I used unhomogenized raw whole milk from Sprout's)
  • 1 packet direct set buttermilk starter
Implements:
  • 2 qt. pot
  • Dairy Thermometer
  • Slotted spoon

Procedure:
  • Pour the milk into a 2 qt. pot and affix the thermometer in a readable position.
  • Heat the milk to between 86°F.
  • Add the starter; let the milk set undisturbed at room temperature (72°F) for 12 hours, or until coagulated.
  • It is now ready to use, and will keep for up to 1 week stored in the refrigerator.

45 rpm Pancakes adapted from The Grit Cookbook: World-Wise, Down-Home Recipes.
Yields 6 to 8 seven-inch pancakes.
Ingredients:
  • 1 C all-purpose flour
  • 1 C whole wheat flour
  • 2 t sugar
  • 1 t baking powder
  • 1/2 t baking soda
  • 1/4 t salt
  • 2 large eggs, beaten
  • 1/4 C melted butter
  • 2 C buttermilk
  • 1/3 C water
  • 1 t pure vanilla extract
Procedure:
  • Preheat griddle or lo-inch nonstick skillet over medium heat.
  • Sift flours, sugar, baking powder, baking soda, and salt into a large mixing bowl.
  • In a smaller bowl, stir together eggs, butter, buttermilk, water, and vanilla extract.
  • Stir wet ingre­dients into dry ingredients just until fully blended. (Batter can be somewhat lumpy. Do not overmix.)
  • Test the temperature of the griddle or skillet by flicking a few drops of cold water onto it—if drops bounce and sputter, rather than merely steaming or boiling, the griddle is ready for use. Lightly coat the cooking surface with butter, vegetable oil, or, if you're really gluttonous, bacon grease.
  • For each pan­cake, ladle 1/3 to 1/2 cup batter onto the griddle or skillet from a steady height of 2 to 3 inches.
  • When bubbles first appear on uncooked side, begin checking for proper brown­ing on cooked side. When lightly browned, flip and finish cooking.
  • Serve immediately or keep warm in a preheated 20o°F oven while the rest are being cooked.

Previous Au Lait du Mois:

Click here to see the rest of this post...

Monday, August 22, 2011

Anonymous Overloads Fullerton's Servers

Don't know if you've heard, but a schizophrenic, urban outdoorsman named Kelly Thomas passed away after an encounter with six Fullerton Police officers on July 5th left him in a coma. The hacking group Anonymous, along with lots of other folks, has called for the City of Fullerton to take action. According to the L.A. Times "The effort by the group Anonymous in response to the deaths of two men was apparently thwarted in Fullerton." But I have some circumstantial evidence that indicates said effort was not thwarted. Specifically, I think the City of Fullerton server ipac.cityoffullerton.com has been experiencing a denial-of-service attack for at least the past two weeks. Read the following email chain, including the metadata headers. I redacted my own email address to avoid spam.

The following message to was undeliverable.
The reason for the problem:
5.4.7 - Delivery expired (message too old) 'timeout'

Final-Recipient: rfc822;reference@fullertonlibrary.org
Action: failed
Status: 5.0.0 (permanent failure)
Diagnostic-Code: smtp; 5.4.7 - Delivery expired (message too old) 'timeout' (delivery attempts: 0)


---------- Forwarded message ----------
From: Sarah------------------
To: reference@fullertonlibrary.org
Date: Thu, 18 Aug 2011 16:40:02 -0700
Subject: Online Catalog Not Working?
Good afternoon,
I've been trying to search the Fullerton Public Library's online
catalog for about a week. Every time I try I receive the following
error message:
The connection has timed out
The server at ipac.cityoffullerton.com is taking too long to respond.
Is the online catalog not working or am I doing something wrong?
Thank you,
Sarah ------

I'm not saying the City of Fullerton is trying to cover up the fact that they've been hacked for covering up the fact that police killed a homeless man, I'm just saying . . . my kid's been without library books for two weeks and it's starting to get cahrazy up in here.

Click here to see the rest of this post...

Saturday, August 20, 2011

Soda is Evil: A Visual Aid

Harmful Soda
Via: Term Life Insurance
Over on the Kitchn yesterday I saw this fabulous graphic disseminated by termlifeinsurance.org, of all things, about all the ways drinking soda slowly kills you. If you haven't already foresworn carbonated chemicals, this might just convince you.

Friday, August 19, 2011

National Geographic Magazine for Kids

When I was a kid my parents had subscriptions to a ton of magazines. I whiled away hours flipping through them, even if it was just to see the pretty graphs and gross pictures in JAMA. We always had a stack of old National Geographic magazines available to reread or chop into collages. Between reducing our paper consumption and the availability of content online, we have no magazine subscriptions. The closest thing is the monthly Zoonooz that comes with our San Diego Zoo membership. The wee bairn devours Zoonooz, almost literally, immediately upon arrival. So when I saw our local Sierra Club kids auxiliary recommending the National Geographic Little Kids Magazine I became intrigued. Any thoughts on periodicals for the sub-preschool set?

Tuesday, August 16, 2011

August's Pizza del Mese: Chili Deep-Dish Pizza

You know when you try out a new recipe and the resultant dish isn't anything amazing in and of itself, but something about it opens up a world of possibilities? That's what happened when I made Chili Deep-Dish Pizza. I'm not in love with the Chili Deep-Dish Pizza, but I am in love with Deep-Dish Pizza and the fact I can successfully make it at home. As my official taste tester and I were eating, we kept interrupting one another with different ideas for toppings. This kind of revelation is the reason I love cookbooks by Bruce Weinstein and Mark Scarbrough.

When I was waiting to pick up a deep dish pizza at our local Chicago-style pizza place, Tony's, I read an old interview with Tony. He explained why the tomatoes are on top of the toppings in a deep dish pizza. To cook the thick crust completely, the pizza has to remain in a very hot oven for a relatively long time (Tony bakes his pies for 45 minutes). The tomatoes on top prevent the underlying toppings from drying out during the long baking time. So if you've recently canned 60 pounds of San Marzano plum tomatoes, consider using some to top a deep dish pizza.
Chili Deep-Dish Pizza adapted from Pizza: Grill It, Bake It, Love It! by Bruce Weinstein and Mark Scarbrough
Ingredients
  • Vegetable oil to grease a 10-inch springform pan
  • One recipe Classic Pizza Dough (see recipe in January's Pizza del Mese)
  • 1 T vegetable oil, plus additional for greasing the pan
  • 1 small onion, chopped
  • 1/2 medium green bell pepper, seeded and chopped
  • 8 oz. (1/2 pound) lean ground beef
  • 2 T chili powder
  • 2 t ground cumin
  • 1 14-oz. can diced tomatoes (Both the juice and the tomatoes are used, but at separate points in the recipe, so don't discard the juice when draining the tomatoes.)
  • 3 oz. mozzarella, shredded
  • 3 oz. monterey jack, shredded
  • 3 oz. queso blanco, crumbled
Procedure
  • Position the rack in the center of the oven. Preheat the oven to 450.
  • Apply a thin coating of vegetable oil to the 10-inch springform pan. Press the dough into the pan, stretching the dough across the pan's bottom and then pulling the dough a bit up the sides, about 1 inch. Cover with a clean kitchen towel.
  • Heat the oil in a large skillet set over medium heat. Add the onion and bell pepper; cook, stirring often, until softened, about 3 minutes.
  • Crumble in the ground beef; cook, stirring often, until well browned and cooked through, about 5 minutes.
  • Stir in the chili powder and cumin, then pour in the juice from the canned tomatoes. Cook, stirring constantly, until the liquid in the pan has turned into a thick, glazelike sauce, 2 to 4 minutes. Set aside.
  • Remove the towel and re-press the dough so that it forms an edge up the in­ side of the pan about 1 inch high. Sprinkle the shredded mozzarella and jack evenly over the inside of the crust.
  • Top with the ground-beef mixture, then sprinkle the canned diced tomatoes
    evenly over the pizza. Finally, top with the crumbled queso bianco.
  • Place the pie in the oven on the middle rack. Check it about every three minutes for the first nine minutes to pop any air bubbles that may blow up at its edge. Bake until the cheese has melted and the sauce is bubbling and a little thick, about 30 minutes.
  • Transfer the pizza pan to a wire rack to cool for 5 minutes. Open the springform and remove the pie from the pan, transferring it directly to the wire rack to cool for another 5 minutes, then cut into wedges to serve.
Previous Pizza del Mese:

Click here to see the rest of this post...

Monday, August 15, 2011

July's Au Lait du Mois: Queso Blanco

In an effort to catch up on my Au Lait du Mois and Pizza del Mese posts, I made queso blanco to use in August's Pizza del Mese. Stay tuned for that post coming tomorrow.

Queso Blanco is much like Panir - both use acid to precipitate the protein from the milk to form curds. The difference is that Queso Blanco uses vinegar as the acid where Panir uses lemon juice. As vinegar these days has a much more consistent pH than lemons, Queso Blanco is much more likely to work out for you than Panir. Ricki recommends apple cider vinegar, which is what I used this time. I've made this using red wine vinegar and it has a very different taste. If you've got different vinegars taking up room in your cabinets, try making a variety of queso blanco and have a tasting.
Queso Blanco adapted from Ricki Carroll's Gourmet Home Dairy Kit
Ingredients:
  • 1/2 gal whole milk (I used unhomogenized pasteurized whole milk from Trader Joe's)
  • 1/4 C apple cider vinegar
Implements:
  • 2 qt. pot
  • Dairy Thermometer
  • Slotted spoon
  • Sieve
  • Bowl
  • Butter Muslin

Procedure:
  • Pour the milk into a 2 qt. pot and affix the thermometer in a readable position.
  • Heat the milk to between 185° and 190°F, stirring often to prevent scorching.
  • Meanwhile, set a sieve over a bowl and line the sieve with butter muslin.
  • Once the milk reaches about 185 degrees, slowly add the vinegar to the milk, a little at a time, until the curds separate from the whey. Usually 1/4 cup of vine­gar will precipitate as much as 1 gallon of milk. You may increase the temperature to 200°F in order to use less vinegar and avoid an acidic or sour taste in your cheese. (Do not boil, as boiling will impart a "cooked" flavor.)
  • Ladle the curds into the muslin-lined sieve. Tie the corners of the muslin into a knot and hang the bag to drain for several hours, or until the
    cheese has reached the desired consistency. As a busy Mom, I hung mine for about 24 hours.
  • Remove the cheese from the muslin. Store in a covered bowl in the refrigerator for up to 2 weeks.

Previous Au Lait du Mois:

Click here to see the rest of this post...

Sunday, August 14, 2011

60 Pounds of Tomatoes


My sister Katherine came for a visit and I put her to work processing 60 pounds of San Marzano plum tomatoes. It took us about 6 hours from putting the canner on the stove to boil to pulling the last jar out of the pot. We followed the directions for hot packed whole tomatoes. We ended up with 19 quarts and 7 pints. Some of the jars could have been filled more, so I think the estimate of 3 pounds of tomatoes per quart is accurate. They smelled delicious as we were working. I can't wait to make some awesome soups and stews this winter.

July's Pizza del Mese: Plum Tomato and Fresh Mozzarella Pizza

July's Pizza del Mese takes advantage of everything ripe in your garden in July, even though it was made in August. Also, have you ever received a super fancy bottle of olive oil and thought, "What the heck am I supposed to do with that?" This pizza is the answer to that question. First, it's got an olive oil pizza dough that is delicious. Second, it actually calls for drizzling olive oil over the top just before serving. So good!

The recipe calls for plum or Roma tomatoes, but the preface to the recipe says that's just for winter grocery shopping. This time of year, they recommend whatever tomato looks best on your vines. Between the fresh tomatoes, fresh basil, and oregano leaves, or parsley leaves, or marjoram leaves, or stemmed thyme leaves, you could really harvest your crops before they all go to seed.
Plum Tomato and Fresh Mozzarella Pizza adapted from Pizza: Grill It, Bake It, Love It! by Bruce Weinstein and Mark Scarbrough
Ingredients
  • Vegetable oil to apply to the cooking surface of Lodge Pro Logic Cast-Iron 14-Inch Pizza Pan
  • One recipe Olive Oil Pizza Dough (see recipe below)
  • 8 oz. (1/2 pound) fresh mozzarella, thinly sliced
  • 8 to 12 large basil leaves
  • 3 medium plum or Roma tomatoes, thinly sliced
  • 4 garlic cloves, minced
  • 2 t minced oregano leaves, or parsley leaves, or marjoram leaves, or
    stemmed thyme leaves
  • 1/2 t salt, preferably coarse kosher salt
  • 1/2 teaspoon freshly ground black pepper
  • 1 tablespoon extra virgin olive oil
Procedure
  • Position the rack in the center of the oven. Preheat the oven to 450.
  • Apply a thin coating of vegetable oil to the surface of the cast iron pizza pan. Lay the dough at its center and dimple the dough with your fingertips. Then pull and press the dough until it forms a 14-inch circle on the pizza pan.
  • Lay the sliced mozzarella evenly over the dough or crust, leaving a 1/2-inch
    border around its edge; then tuck in the basil leaves among the slices.
  • Place the tomatoes on top, then sprinkle the minced garlic, herbs, salt, and
    pepper evenly over the tomatoes and cheese.
  • Place the pie on its pizza pan in the oven on the middle rack. Check it about every three minutes for the first nine minutes to pop any air bubbles that may blow up at its edge or across its surface. Bake until the crust's edge is golden brown, 16 to 18 minutes.
  • Transfer the pizza pan to a wire rack to cool for 3 minutes. Remove the pie from the pan, transferring it directly to the wire rack to cool for about 5 minutes.
  • Drizzle the extra virgin olive oil over the pizza, then cut into wedges to serve.
Olive Oil Pizza Dough adapted from Pizza: Grill It, Bake It, Love It! by Bruce Weinstein and Mark Scarbrough Ingredients
  • 1/2 C lukewarm water (between 105 F and 115 F)
  • 1 1/2 t active dry yeast
  • 1/2 t sugar
  • 1/2 t salt
  • 2 C bread flour
  • 1/4 C olive oil
Procedure
  • Fill the bowl of a stand mixer with warm tap water, drain it, and dry it thoroughly. Stir the water, yeast, sugar, and salt together in the bowl just until everything is dissolved. Set aside so the yeast can begin to bubble and foam, about 5 minutes. If it doesn't, throw the mixture out and start again. The water may not have been the right temperature or the yeast expired.
  • Add the flour and olive oil, attach the dough hook, and beat at medium speed until combined. Continue kneading at medium speed, adding more bread flour in 1 T increments if the dough gets sticky, until the mixture is soft and elastic, about 7 minutes.
  • Wipe a clean, large bowl with a bit of olive oil on a paper towel. Place the dough in the prepared bowl, turning the dough so all sides are coated with oil, and cover the bowl with plastic wrap. Set aside in a warm, draft-free place until doubled in bulk, about 2 hours.
Previous Pizza del Mese:

Click here to see the rest of this post...

Wednesday, August 10, 2011

June's Au Lait du Mois: Sour Cream

Yes, yes, it's August. But June's Au Lait du Mois was in fact made in June!

No, that picture is not plain sour cream. Rebecca made a dip out of the sour cream by adding Penzeys Spices Chip and Dip Seasoning. Yum!
Sour Cream adapted from Ricki Carroll's Gourmet Home Dairy Kit
Ingredients:
  • 1 qt. light cream
  • 1 packet sour cream culture

Implements:
  • 2 qt. pot with lid
  • Dairy Thermometer
  • Slotted spoon
  • Yogotherm yogurt incubator

Procedure:
  • Pour the light cream into a 2 qt. pot and affix the thermometer in a readable position.
  • Heat the light cream to 86 degrees.
  • Pour the light cream into the Yogotherm.
  • Sprinkle 1 packet of the sour cream culture over the top of the light cream. Wait about a minute to let the culture bloom. Then stir the culture into the light cream.
  • Cover and allow to set for 12 to 24 hours. We let ours set for 24 hours and it seemed a bit thin.

Previous Au Lait du Mois:

Click here to see the rest of this post...

Tuesday, August 09, 2011

June's Pizza del Mese: BLT Pizza

Hey, it's still August and I'm already up to June's Pizza del Mese. Maybe I'll be all caught up by December. I finally found a pizza from Pizza: Grill It, Bake It, Love It! by Bruce Weinstein and Mark Scarbrough that I'm not madly in love with. The BLT Pizza is from a small chapter containing five salad pizzas. The crust is fantastic and the B and T are great. I'm just not personally up to L on my pizza. My designated taste tester had a great suggestion for pizza purists: serve the dressed lettuce on the side.

I also just used some hearty romaine from my CSA basket rather than buying iceberg lettuce as directed in the recipe. The heat of the pizza really messes with the consistency of the lettuce fast. Perhaps the crunchy iceberg would have maintained its texture better and that might have made me love the pizza.

But my lettuce issues aside, the Cracker Pizza Dough ROCKS. If you like crispy, thin crusts that look like they just came out of the wood oven at A Tavola in Athens, Georgia, or Fritti in Atlanta, this is the pizza dough recipe for you. Can you tell I haven't had descent thin crust pizza in a long time?

BLT Pizza adapted from Pizza: Grill It, Bake It, Love It! by Bruce Weinstein and Mark Scarbrough

Ingredients
  • Vegetable oil to apply to the cooking surface of Lodge Pro Logic Cast-Iron 14-Inch Pizza Pan
  • One recipe Cracker Pizza Dough (see recipe below)
  • 12 oz. bacon strips
  • 1 1/2 T plus 1 t Dijon on honey mustard
  • 6 oz. mozzarella, shredded
  • 1 large beefsteak tomato, seeded and diced
  • 2 T regular, low-fat, or fat-free mayonnaise
  • 2 t lemon juice
  • 1 t Worcestershire sauce
  • 2 C shredded, packed iceberg lettuce
Procedure
  • Position the rack in the center of the oven. Preheat the oven to 450.
  • Apply a thin coating of vegetable oil to the surface of the cast iron pizza pan. Lay the dough at its center and dimple the dough with your fingertips. Then pull and press the dough until it forms a 14-inch circle on the pizza pan.
  • Fry the bacon strips in a large skillet over medium heat until just starting to
    turn brown, turning occasionally, about 3 minutes. Remove the strips from the skillet and cut into 1-inch pieces. Set aside.
  • Spread 1 1/2 T mustard over the crust, leaving a 1/2-inch border at its
    edge. Sprinkle the shredded mozzarella evenly over the mustard, then top with
    the diced tomato and the chopped bacon.
  • Place the pie on its pizza pan in the oven on the middle rack. Check it about every three minutes for the first nine minutes to pop any air bubbles that may blow up at its edge or across its surface. Bake until the crust's edge is golden brown, 16 to 18 minutes.
  • Transfer the pizza pan to a wire rack to cool for 3 minutes. Remove the pie from the pan, transferring it directly to the wire rack to cool for about 5 minutes.
  • Meanwhile, whisk the mayonnaise, lemon juice, Worcestershire sauce, and
    the remaining 1 t mustard in a large bowl until smooth.
  • Add the lettuce and toss until well coated. Mound the dressed salad onto the
    pizza, then cut into wedges to serve.
Cracker Pizza Dough adapted from Pizza: Grill It, Bake It, Love It! by Bruce Weinstein and Mark Scarbrough Ingredients
  • 1/2 C lukewarm water (between 105 F and 115 F)
  • 1/4 t active dry yeast
  • 1/4 t baking soda
  • 1/4 t salt
  • 1 1/2 C bread flour
  • 2 t olive oil
Procedure
  • Fill the bowl of a stand mixer with warm tap water, drain it, and dry it thoroughly. Stir the water, yeast, baking soda, and salt together in the bowl just until everything is dissolved.
  • Add the flour and olive oil, attach the dough hook, and beat at medium speed until combined. Continue kneading at medium speed, adding more bread flour in 1 T increments if the dough gets sticky, until the mixture is soft and elastic, about 4 minutes.
  • Wipe a clean, large bowl with a bit of cooking oil on a paper towel. Place the dough in the prepared bowl, turning the dough so all sides are coated with oil, and cover the bowl with plastic wrap. Set aside in a warm, draft-free place until doubled in bulk, about 2 hours. Because there's not much yeast, the dough will not double in bulk but will rise a little and soften somewhat.
Previous Pizza del Mese:

Click here to see the rest of this post...

Monday, August 08, 2011

Wishbone 3-in-1 Bike

The Wishbone 3-in-1 Bike my in-laws purchased last Friday at No Sugar Added for my 19-month-old arrived in the mail this Friday afternoon.

It took me just under 35 minutes to get it from pieces in the box to a tricycle and that included reading the instructions. If you are considering buying one but are concerned about the assembly, please know that if you've put together a bookcase from IKEA, you can put together this bike. The only thing required that isn't in the box is a Phillips-head screwdriver.
Please also remember to buy a helmet. We forgot and had to postpone her maiden voyage until we could swing by the bike shop and buy one.

Click here to see the rest of this post...

Sunday, August 07, 2011

May's Pizza del Mese: Fig and Prosciutto Pizza

Your eyes do not deceive. It is indeed August and I am just now posting May's Pizza del Mese. Want to do the time warp again? We made it in June in Rhode Island and again in July in California. Crazy stuff. But all that confusion is well worth it in the case of Fig and Prosciutto Pizza. This is our favorite pizza so far.

In Rhode Island Rebecca used her own magical pizza dough recipe. The book Pizza: Grill It, Bake It, Love It! by Bruce Weinstein and Mark Scarbrough recommends using their Whole Wheat Pizza Dough recipe, which I included below. Whole wheat pizza dough has similar connotations as whole wheat pasta--healthier, but at the expense of texture. But Bruce and Mark's whole wheat pizza dough is awesome. You won't think you're eating healthy at all.
Speaking of healthy, the original recipe calls for 12 ounces (3/4 pound) broccoli rabe, chopped (about 2 cups). That stuff is great for you, but if you can't find it locally, just use whatever dark leafy green you've got handy. My CSA basket overfloweth with chard, so I used that and it was awesome.
The pizza pictured above is Rebecca's creation in Rhode Island. Neither in Rhode Island nor in California did I get it together enough to remember to buy Gorgonzola or Danish blue cheese. The original recipe calls for 1 to 2 ounces Gorgonzola or Danish blue, crumbled, sprinkled along with the rosemary and black pepper just before popping this beauty into the oven. It turned out delectable, but next time I'll try to remember the funky cheese.
Rebecca bakes her pizza on parchment paper. She uses the back of a cookie sheet like a peel.
In Rhode Island we improvised the toppings based on my vague recollection that there was a pizza involving figs and prosciutto. The grocery store there only had dried figs, so we soaked them in water overnight. They were much sweeter than the fresh figs. Not a bad thing, just different. The fresh figs have a very mild taste, so I used about twice as many as the original recipe called for.

As long as fresh figs are in season, I'll continue to make this awesome pizza.

Fig and Prosciutto Pizza adapted from Pizza: Grill It, Bake It, Love It! by Bruce Weinstein and Mark Scarbrough

Ingredients
  • Vegetable oil to apply to the cooking surface of Lodge Pro Logic Cast-Iron 14-Inch Pizza Pan
  • One recipe Whole Wheat Pizza Dough (see recipe below)
  • 2 T olive oil
  • 12 oz. (3/4 lb.) chard or other dark leafy green, chopped (about 2 cups)
  • 2 garlic cloves, minced
  • 6 T Classic Pizza Sauce (see recipe in January's Pizza del Mese: Pizza Margherita)
  • 6 oz. mozzarella, shredded
  • 3 oz. thinly sliced prosciutto, chopped
  • 6 fresh, ripe figs, quartered
  • 2 T minced fresh rosemary
  • 1/2 t freshly ground black pepper
Procedure
  • Position the rack in the center of the oven. Preheat the oven to 450.
  • Apply a thin coating of vegetable oil to the surface of the cast iron pizza pan. Lay the dough at its center and dimple the dough with your fingertips. Then pull and press the dough until it forms a 14-inch circle on the pizza pan.
  • Heat a large skillet over medium heat. Add the 2 T olive oil. Once it heats up, add the chard. Saute until wilted, about 4 minutes. Add the garlic and continue stirring often, until tender, about 4 more minutes.
  • Spread the pizza sauce evenly over the crust, leaving a 1/2-inch border at its perimeter. Top the sauce with the shredded mozzarella.
  • Spoon the chard and garlic over the pizza, then top with the prosciutto and fig quarters. Sprinkle the rosemary and black pepper over the pie.
  • Place the pie on its pizza pan in the oven on the middle rack. Check it about every three minutes for the first nine minutes to pop any air bubbles that may blow up at its edge or across its surface. Bake until the crust's edge is golden brown, 16 to 18 minutes.
  • Transfer the pizza pan to a wire rack to cool for 3 minutes. Remove the pie from the pan, transferring it directly to the wire rack to cool completely. Transfer the pie to a cutting board to slice the pizza into wedges to serve.
Whole Wheat Pizza Dough adapted from Pizza: Grill It, Bake It, Love It! by Bruce Weinstein and Mark Scarbrough Ingredients
  • 3/4 C lukewarm water (between 105 F and 115 F)
  • 2 t active dry yeast
  • 1 t sugar
  • 1/2 t salt
  • 1 1/3 C bread flour
  • 2/3 C all-purpose flour, plus additional for dusting
  • 2 T canola or vegetable oil
Procedure
  • Fill the bowl of a stand mixer with warm tap water, drain it, and dry it thoroughly. Stir the water, yeast, sugar, and salt together in the bowl just until everything is dissolved. Set aside at room temperature for 5 minutes to make sure the mixture bubbles and foams. If it doesn't, either the yeast expired or the water was not the right temperature. Throw the mixture out and start again.
  • Add both flours and the oil, attach the dough hook, and beat at medium speed until combined. Continue kneading at medium speed, adding more all-purpose flour in 1 T increments if the dough gets sticky, until the mixture is soft and elastic, about 8 minutes.
  • Wipe a clean, large bowl with a bit of cooking oil on a paper towel. Place the dough in the prepared bowl, turning the dough so all sides are coated with oil, and cover the bowl with plastic wrap. Set aside in a warm, draft-free place until doubled in bulk, about 1 1/2 hours.
Previous Pizza del Mese:

Click here to see the rest of this post...

Monday, July 25, 2011

Quote from The Play Ethic

Pat Kane's The Play Ethic is a heavy book that I haven't finished. While looking for potential quotes and references about using games for education, I came across a passage that struck me, so here it is. (Some context may be necessary: he's talking about the educational system playing a role in developing the ethics of students growing up in their current hypernetworked society)

The moment of learning could be about forging a fully humane, yet fully contemporary student...children who are encouraged to express their moral, ethical, and reciprocal selves through the channels of the information age rather than use these media for actively destructive ends, or passively submit themselves to the external programming of others.


I should possibly leave it there, but to keep me from forgetting this moment, even though this was written in 2004 it seems to me to address fears about sexting and online bullying and Facebook oversharing and losing one's real self in a virtual reality. Which were not the top anxieties about kids online in 2004, but Kane seems to point a way to cope with these (and, I suspect, whatever the next panic will be).

Monday, June 13, 2011

Kids Books about Nature

So we're in the midst of Biome Tour 2011 here. We went to Santiago Oaks Regional Park last week and the Santa Rosa Plateau Ecological Reserve this week. We've got crazy plans for every Friday for the rest of the summer. But how do we keep that nature theme rolling between outings? Books, books, and more books. Thankfully the Playful Learning blog just posted their favorite nature books for kids and the comments are full of even more suggestions. What are your favorite nature books for kids?

Friday, June 10, 2011

Furrday: Augie Tuckered, Izzy RTG

Back on May 13th David's colleague Lucy visited us. They took Augie and Izzy on a megawalk. Lucy snapped these pictures while Augie took a breather on campus before heading home.

"I'm ready for another lap," Izzy seemed to say.

Click here to see the rest of this post...

Tuesday, May 31, 2011

Lodge Cast Iron Pizza Pan Reviewed at Serious Eats

Donna Currie has been posting a series of reviews of different pizza cooking surfaces. Today she posted her review of the Lodge Pro Logic Cast-Iron 14-Inch Pizza Pan. Co-blogger Rebecca gave me one for Hanukkah/Christmas/Solstice/Kwanzaa/New Year 2010. That's what I've been making all of my Pizza del Mese on. But Ms. Currie uses the pan in an unexpected way. She preheats the pan in the oven and then throws the prepared pizza upon it. So she complains that the pizza surface is small . . . because you have to throw your gooing pizza onto a flaming hot circle of iron. She also said she got some char on the underside of the pizza, which I've never experienced. I wonder if she'd have better success using it like I do, kinda following the description of how to cook a pizza using a pizza pan from Bruce Weinstein and Mark Scarbrough in Pizza: Grill It, Bake It, Love It! She did say

The crust was about as good as it gets.

Thursday, May 19, 2011

May's Au Lait Du Mois: Mascarpone Cheese


I strained the leftover 'creme' fraiche to make the cheese. It turned out well and I used the results to make pasta with peas and prosciutto.


I've been happy with my cheeses, but I have to say that I haven't tasted much difference in the soft cheeses that we've made. One day, when we want a lot of cheese, I'll have to make a few and compare them next to each other.

"April's" Au Lait du Mois: "Creme" Fraiche


I couldn't find any non ultra-pasteurized half and half so I decided to try this with whole milk. It turned out fine, although the texture was a little grainy. We used the creme fraiche on baked potatoes.


Monday, May 16, 2011

May's Au Lait du Mois: Mascarpone

This post breaks the first rule of blogging: Show, don't tell. The camera was just too far from my grasp in the few moments I had to make May's Au Lait Du Mois, so you'll just have to suffer with a photo-less post. Trust me when I say, it looked like cream cheese, but tasted sweeter and less tangy

Not only do I have no pictures for you, but the recipe is a bit of a cop out on the heels of Creme Fraiche. Really you just make Creme Fraiche and then ladle it into a colander lined with butter muslin to drain for 6 to 10 hours in the fridge. That's it.

The booklet that comes with Ricki Carroll's Gourmet Home Dairy Kit contains a recipe for Mascarpone Cheesecake, which inspired me to make Cookies and Cream Cheesecake Cupcakes with my mascarpone. They were delectable.

Previous Au Lait du Mois:

Click here to see the rest of this post...

Monday, May 02, 2011

April's Pizza del Mese: Alsatian Tarte Flambe


After the first two slices, this Alsatian Tarte Flambe (how much fun is that to say?) was my official taste tester's favorite pizza so far.


The bacon flavor was intense, but nicely balanced by the sweetness of the sweated onions and the creme fraiche. By the last bite of the fourth slice, it was deemed a little too rich. I mistakenly thought this was in the section on Appetizer Pizzas in Pizza: Grill It, Bake It, Love It! by Bruce Weinstein and Mark Scarbrough. My official taste tester took that as a totally valid explanation for the richness. Like this would be perfect on a buffet, but you shouldn't make a meal of it . . . unless you're in the mood for bacon and richness and lingering guilt.

The Alsatian Tarte Flambe is actually in the section on International Pizzas (duh, Alsatian?). And I'm not sure how the Flambe gets in there. Doesn't that usually mean it's served flaming? I don't know. Also, the recipe called for dry white wine or dry vermouth. We're not really drinkers (Did you hear something? Yes, everyone who reads my blog who knew me prior to around 2006 just said, "WHAT?!?"), so the only wine we have in the house is leftover from dinner parties. We've had two open bottles rattling in the door of our refrigerator long enough that I thought it might be possible that they'd turned into vinegar. But no. Unfortunately none of the leftover wine was white (think about that the next time you bring a bottle of red to a dinner party . . . at least at my house). So I used a pinot noir of spurious origins that had been sitting in my refrigerator for a really, really long time. It turned out not to be vinegar. It did turn the onion mixture slightly pink, but the final product didn't look excessively pink. I think it would have been less sweet had I used the prescribed vino, but I liked how this turned out. So if your all out of dry white wine or dry vermouth, don't let that stop you from whipping up an Alsatian Tarte Flambe.

Alsatian Tarte Flambe adapted from Pizza: Grill It, Bake It, Love It! by Bruce Weinstein and Mark Scarbrough

Ingredients

  • Vegetable oil to apply to the cooking surface of Lodge Pro Logic Cast-Iron 14-Inch Pizza Pan
  • One recipe Classic Pizza Dough (see recipe in January's Pizza del Mese)
  • 6 oz. bacon strips
  • 1 medium yellow onion, halved through the stem, then thinly sliced
  • 1/4 C dry white wine or whatever wine you have left over from your last dinner party in the fridge (I used a pinot noir of questionable origin)
  • 1 C creme fraiche
  • 1/4 t grated or ground nutmeg
  • 1/4 t freshly ground black pepper
Procedure
  • Position the rack in the center of the oven. Preheat the oven to 450.
  • Apply a thin coating of vegetable oil to the surface of the cast iron pizza pan. Lay the dough at its center and dimple the dough with your fingertips. Then pull and press the dough until it forms a 14-inch circle on the pizza pan.
  • Heat a large skillet over medium heat. Add the bacon strips and cook until
    somewhat browned but still limp, 3 to 4 minutes. (They will cook more on top of the pie.) Transfer to a plate.
  • Add the onions to the bacon fat in the skillet and cook, stirring occasionally,
    until wilted, soft, and quite fragrant, about 8 minutes.
  • Pour in the wine and raise the heat to medium-high. As the wine simmers,
    scrape up any browned bits on the skillet's bottom. Continue cooking at a full
    simmer until the liquid in the skillet is a thick glaze over the onions, about
    4 minutes.
  • Spread the creme fraiche over the prepared crust, keeping a 1/2-inch border at
    the edge. Chop the bacon and sprinkle it over the pie.
  • Use a rubber spatula to spoon and spread the softened onions and their glaze
    over the pizza, again keeping that border intact. Sprinkle with the nutmeg and
    pepper.
  • Place the pie on its pizza pan in the oven on the middle rack. Check it about every three minutes for the first nine minutes to pop any air bubbles that may blow up at its edge or across its surface. Bake until the crust's edge is golden brown, 16 to 18 minutes.
  • Transfer the pizza pan to a wire rack to cool for 3 minutes. Remove the pie from the pan, transferring it directly to the wire rack to cool completely. Transfer the pie to a cutting board to slice the pizza into wedges to serve.
Previous Pizza del Mese: January's Pizza del Mese: Pizza Margherita February's Pizza del Mese: Mushroom Pizza March's Pizza del Mese: Broccoli and Tomato Sauce Pizza

Click here to see the rest of this post...